
We all use computers every day; eventually, unwanted programs clog up our hard drive, waste precious storage and hinder the computer performance. It’s frustrating when simple tasks such as running programs, browsing the Web or sending emails, take a considerable amount of time. Just like any other electronic equipment, periodic maintenance can play a key role in decluttering your computer system and improving the overall performance — all without needing to approach a computer technician. In this tutorial, we’ll provide a step-by-step solution to remove unwanted programs, files & junk and declutter your Windows 11 computer.
Step 1: Reset Your PC
The “Reset this PC” feature in Windows 11 is a fast, easy and convenient way to restore your Windows to the factory settings. Using this feature, you’ll be able to remove unwanted programs that were installed by you over a period of a few years (including any registry entries and files created by these programs).
What Does Reset this PC Feature Do?
When you use the “Reset this PC” feature, your computer will be restored to the factory settings with all the default configurations, similar to a fresh format and Windows installation. Reset removes everything, including any applications on your machine, your files (unless you choose not to remove them).
How Does Reset This PC Works?
“Reset this PC” shutdowns your machine and boots it into a Windows Recovery Environment (commonly known as, Windows RE). It then formats your Windows partition (drive C:\) which erases everything. If you’ve chosen to keep your files, they will be kept aside and will be moved again to the original location after completion of the reset process.
Warning
It is highly recommended that you take a complete backup of your documents and files before resetting your PC. Accidentally choosing the “Remove everything” will delete all your personal documents and files and cause unexpected data loss.
Steps:
1. Click the Start icon on the Taskbar.
2. Click on Settings.
3. Click on the Windows Update tab.
4. Click on Advanced Options.
5. Click on Recovery.
6. Click on “Reset PC” under the “Reset this PC”.
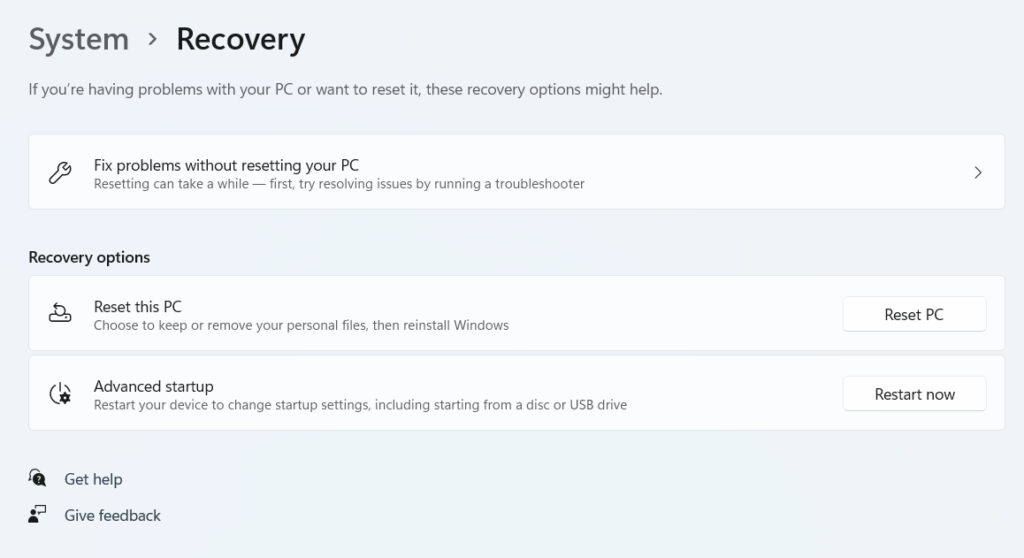
7. Click on “Keep my files” and follow the on-screen instructions.
Limitations
“Reset this PC” feature will reinstall any bloatware that came preinstalled from your computer manufacturer. This won’t be the case if you had reinstalled Windows from scratch yourself.
Step 2: Uninstall Manufacturer Installed Bloatware
You may want to skip this step if you’ve installed a fresh copy of Windows yourself, and your computer did not came with Windows preinstalled in it. For example, your computer was shipped with DOS and you fresh installed Windows 11 yourself. In that case, there’s no question of manufacturer installed bloatware.
What is a Bloatware?
Your manufacturer may ship your computer with additional set of third-party software that you may not need or have never asked for. Such unnecessary software can make your computer start slower, take up more memory & CPU usage, waste your storage, and reduce the battery life. Including such bloatware can often be an additional source of revenue to your manufacturer.
Removing Bloatware
If your computer came with a pre-installed copy of Windows from the manufacturer, there may be a lot of unwanted programs you may want to get rid of. As you remove unwanted programs and bloatware installed by the manufacturer, you free-up precious storage space and make your computer lighter by reducing the programs that automatically start at the Windows startup.
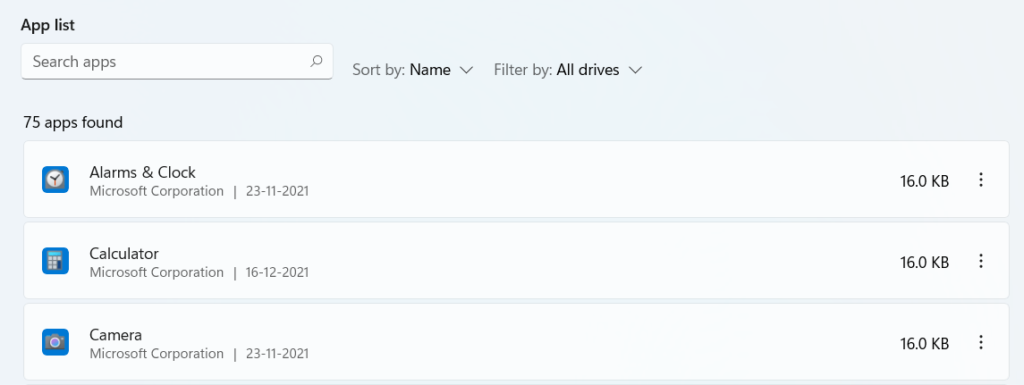
There are multiple ways to remove such bloatware and make your Windows 11 PC run faster. You can look for such manufacturer installed bloatware in the App List consisting of regular programs as well as Windows Store apps as shown under:
Steps:
1. Click on Start > Settings.
2. Click on the Apps tab.
3. Click on Apps & features.
4. Uninstall all the unwanted programs one by one.
Step 3: Delete Duplicate Documents & Files
Duplicate files are the identical copies of your original documents. They may be found in the same directory as the original file, or other directories on your hard disk. Duplicate files can take up a considerable storage space, and make it difficult to find your files.
Follow the steps given below to de-dupe your files:
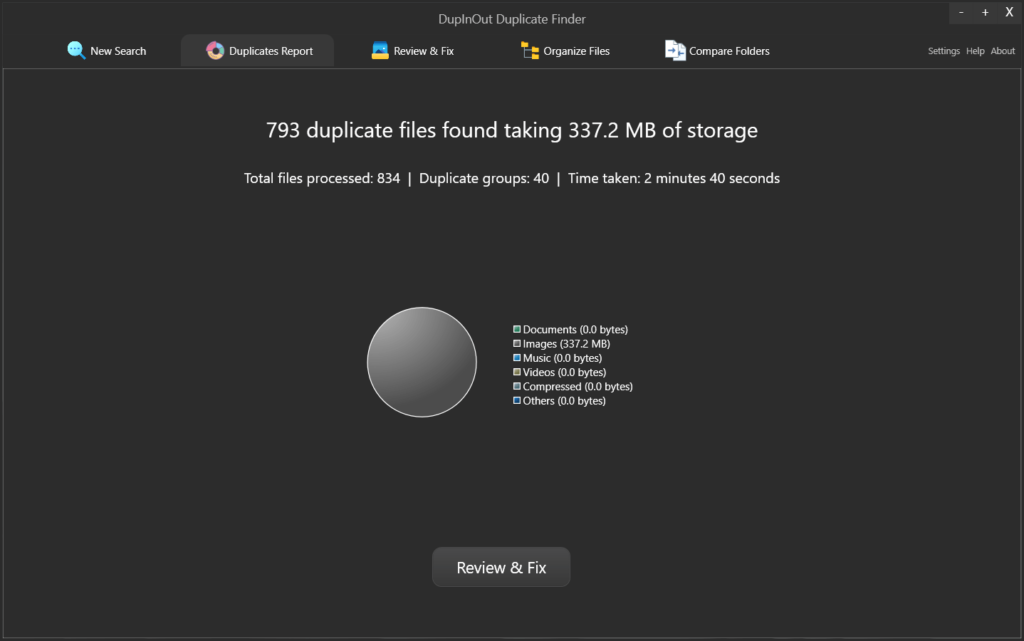
- Download DupInOut Duplicate Finder and install it.
- Click on New Search tab > Add button.
- Choose the folders you want to scan for duplicates.
- Once the scan is finished, review the duplicates list and mark the files you want to delete.
- Click on Select Action > Delete permanently.
Leave a Reply
You must be logged in to post a comment.